June 28, 2011

Riley Blake Quilt Contest

Have you seen the quilt contest on the Riley Blake Blog? They're hosting a contest for quilts made with Riley Blake fabrics, and there are some great prizes!

Camping Shower Bag tutorial . . .

Our family is going to enjoy some campgrounds this Summer, and one of those 'fun' evening activities involves wrapping up the shampoo bottles, shaving cream, and other essentials in a towel, bringing them to the bathroom, and hoping you don't lose anything along the way (or leave them behind!). This is why I came up with the idea of the 'Camping Shower Bag.'

This little bag is lined with PUL (polyurethane laminated fabric); PUL can be found at most fabric chain stores, and it provides a waterproof layer between the contents and outer fabric. The straps on the bag can hang off one of those handy hooks found in most changing areas attached to the shower, which also stops me from placing my bottles and razor on the floor of the shower ~ I can just reach out and grab what I need. The outside pocket keeps anything you want to keep dry, or put anything sharp (like your razor), because razor + PUL = bad.

So here's the steps! Please let me know if anything needs better explaining or is missing! Seam allowance is 1/4".

Step one ~ Cut out your pieces.
For the outer bag ~ 9" x 27". For the pocket ~ 6" x 13". For the straps ~ cut two of 4" x 21" (or a bit longer if you prefer to carry on your shoulder, I like mine to just hang on my arm). For the interior (PUL layer) ~ 9" x 24".

Step two ~ Attach the pocket.

Sew the two pocket side seams right sides together. Turn rightside out and press. Tuck in the unfinished edge about 1/4 inch and press. Center the pocket on main outer bag piece, about 4" from one of the top edges (making sure the unfinished pocket seam is to the bottom). Topstitch the two side seams and bottom edge, making sure to stitch the bottom edge seam closed.
Step three ~ Prepare the straps.
Press straps, making sure to conceal all raw edges.
The most common method of doing this is by pressing in half, then again in quarters, making the finished strap about 1". I find this method a bit bulky on the one edge, and have come up with my own method. I'll try to explain it, but the pictures probably speak for themselves.
First press in both side edges about 1/4" and then bottom edge 1/4". Bring top edge down to about 1/2" from bottom pressed edge, press again. Then bring up bottom edge to top and press. My finished straps are about 1 1/4".
Topstitch close to both long edges of each strap. Set aside.
Step four ~ Prepare bag pieces.
Fold main piece in half (no need for a bottom seam), and sew side seams of main bag, right sides together. Serge or zigzag raw edges.
Make the bottom corners of the bag ~ do this by pushing out corner, and measuring three inches across, mark with a pen. Sew on this line. Trim excess fabric from corner, and serge or zigzag. Repeat for other corner.
Repeat 'Step four' for PUL piece of fabric.
A couple tips when working with the PUL: try to avoid using pins, you don't want to poke holes within the main part of the bag. Never use an iron on an item containing PUL. Serging or zigzagging unfinished edges gives strength to the finished product, but lowering the blade on your serger is a good precaution; and stay beside the initial seam. And if you do find a couple pinholes in your finished bag, or find it's not containing moisture that well, throw the bag into the dryer on low heat for 20 minutes to 'heal' the PUL and close up any small pinholes. But for regular washing, hang indoors to dry (it can be hung outdoors, but right-side out, direct sun on PUL can damage it over time).
Step five ~ Assemble bag.
Press top edge of main piece down 1/2" and then again by 1".
With main fabric wrong side out, place inside PUL layer, wrong sides together. Tuck PUL layer as far as it will go into the top edge of main fabric piece, and sew along bottom edge of the turned-down main fabric. (I did use pins for this part, but make sure they are well out of the way of the seam).
Step six ~ Attach the straps.
Pin the straps to the main bag about 1 1/2 inches from side seams, and making sure to stay above the bottom of turned-down edge.
Sew the straps to bag ~ I stitched an 'X' inside of a square for added strength.
And there you have it! A finished Camping Shower Bag! It fits up to four bottles, my brush, and my razor. It will also come in handy for the gym and swimming this Summer.
And would you look at that?! I just sewed something for me! Now how often does that happen?

June 27, 2011

A 'Welcome Baby' gift . . .

A friend in my church was just blessed with a baby boy, and the big sister of this new babe is one of my oldest daughter's best friends. So Elayna and I pulled some fabric (bright flannel solids and some construction prints) and made a special 'welcome baby Kyle' blanket for him. And I must say, that making a little blanket was much more enjoyable for me than making a meal :)

June 24, 2011

Free Patterns from Accuquilt!

Accuquilt is giving away 22 free patterns for new newsletter subscribers! Just click on the link to get yours and start planning those beautiful projects!

Fold-Away Shopping Bags (aka Last-Minute Teacher Gifts) . . .

My girls really wanted handmade end-of-year teacher gifts this year, and I didn't really think I'd get to it. But then I came accross this tutorial; and in no time at all, these little fold-away shopping bags were done. I've made something similar to these before, and try to keep one in my purse ~ it's come in handy many times!

Linking up to Confessions of a Craft Addict.

June 23, 2011

Accuquilt GO! Baby giveaway!

GIVEAWAY IS CLOSED. WINNER POSTED HERE.

Accuquilt is giving away a GO! Baby and 3 dies of the winner's choice to one of my followers! I have loved cutting and creating with this little machine and I know one of you will get lots of use out of it too!
To enter, you need to be a follower of my blog and leave ONE comment telling me what project you want to make first if you were to win!

But if you include this giveaway in a blog post, please post the link in a second entry.

Winner will be picked by random.org on Friday, July 1st. Good luck!

June 22, 2011

Sew Sweet Patterns Giveaway . . .

These are all little dresses I made this Spring using patterns from Sew Sweet Patterns. I love the simplicity, and finishing touches that these patterns give. And they are dresses that fit true to size, something that frustrates me with the 'big name' patterns.
If you want a chance to win a 5-pack of Sew Sweet Patterns, just go to their new blog to enter! Or if you want to purchase some, check out their shop!
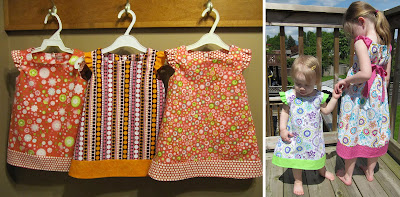
And I'm happy to say that we are getting some gorgeous Summer weather, and sundresses are becoming the daily wear around here!

June 21, 2011

Accuquilt GO! Tumbler Die

When all the buzz about the Accuquilt GO! started happening online, the finished projects that made me really want one of these machines ~ were the Tumbler quilts. And the tumbler die was my first choice when I got to pick out my dies to try out. And it did not disappoint!

This is my pile of tumblers that were cut out in record time. I was able to cut out 18 tumblers at once!
And this is my All Star 2 scraps put to good use ~ in a baby quilt for a sweet baby boy . . .
And Accuquilt is letting me give away a Baby GO! and 3 dies to one of my followers! I'm hoping to get the giveaway post up soon, so please check back!

June 15, 2011

WIP with the Accuquilt Drunkard's Path die . . .

On Friday, I spent some time at my kitchen island with my GO! Baby while the kids played around me. One of the quilts I cut out is going to be a family picnic quilt using the Accuquilt Drunkard's Path die. This is one of those patterns that I admire, but thought that I would never attempt to make ~ the cutting of all these little pieces and sewing curves can be pretty intimidating. But when you use the Accuquilt GO, the cutting is done in no time at all, and it even cuts a little notch in the center of both curves so you know exactly where to match them up.
The sewing of the curves takes some patience and the knee-lift on my machine is coming in handy as I adjust the bulk to make a smooth seam, but the finished up blocks are turning out great. I'm making 36 drunkard's path blocks all together that are 7" finished each. That's 8 little pieces of fabric for every 7" squared, 7 seams per block, 252 seams all together, plus assembling them, plus sashing, plus borders . . . but that's the beauty of creating a quilt, right?

June 10, 2011

Messenger bag . . .

Inbetween playing with my new GO! dies, I made this little messenger bag this week. I roughly used this tutorial which had a lot of good tips and made figuring out the measurements easy, but I left the strap as one piece.
The fabrics were part of a very generous envelope stuffed full of scraps and larger pieces from Sew Fresh Fabrics. The main print is from the Red Letter Day by Lizzy House, and the lining is a cotton/linen blend.
My girls LOVE this bag and I think it's the perfect overnight size or for packing all their stuff to entertain themselves on a long car ride to camping. And it was so quick to make, I think I could be persuaded to make some more for them . . .

June 08, 2011

Accuquilt 5 1/4" Rag Die review . . .

A little while ago I won a GO! Baby Fabric Cutter from Accuquilt on their Facebook Friday Fun. I was so excited!! Then a couple days later, I received an email saying I'd been selected for their blogger program! Now I was squealing and jumping up and down! This machine has been tempting me all over the internet with the promises of faster and more accurate cuts, and all the great dies to choose from. Well, let me tell you ~ I am totally impressed! The GO! Baby is so easy to use!
The first die that I tried out was the 5 1/4" rag square. I was able to cut two layers of flannel at a time, and quickly had all my blocks cut out. Now, the amazing thing about this die is that it does all those little cuts for you!!
And a rag quilt is such a fun and quick quilt to make, but the cutting process can be long and painful. I have spent days with aching finger joints after snipping a rag quilt before. And after washing my new finished rag quilt just once, the ragging looks beautiful! This will be my 'go-to' die for quick quilts from now on ~ it makes such a cozy quilt, and uses up my flannel and batting scraps!
I received 5 more dies from Accuquilt, and I'll be posting about those over the next couple weeks!

June 02, 2011

sewing for this week . . .

I've definitely settled into a routine of 'little projects' during my sewing escapes at nap time. It's always so rewarding to have something completed and ready to be used or given away.
First off was a pair of shorts for my little guy. And yes, he's brushing his teeth with an electric toothbrush. The best $4 I've spent in awhile ~ it can distract him from a temper tantrum, keep him entertained for an hour, and makes him cooperate for pictures . . .
a sundress for a sweet little niece . . .
and two more Sunday book bags for some birthday girls . . .
and look what came in the mail today!! I guess I'll be moving onto those 'bigger' projects now . . .